New Class Session Starts Sept. 6!

Are you ready?

Are you ready?

Fall session is upon us in ONE MONTH! Are you ready to shimmy? I think we will be doing some veil work this time around so bring ’em if you got ’em! I will have spares for students who do not have veils.

Remember: Saturday, Sept. 6, 10am-11am; The Spirit Room, 111 Broadway, Fargo, ND.

If you miss the first class you can easily catch up in week 2 or 3. Contact me if you have any questions at all. Hope to see you all soon!

The Latest News and Events

Queerfest will benefit the Pride Collective Community Center

Queerfest will benefit the Pride Collective Community Center

Hello lovely people! There is so much going on! First and foremost please check out Queerfest this weekend at the Aquarium at 9:30pm. Bad Weather Burlesque will have a bunch of guest performers as well as the wonderful regular cast to entertain you. We’re raising funds for the Pride Collective Community Center.

Pride Weekend is coming up so check out the drag extravaganza that is the Vixen Variety/BJ’s Cabaret/FM Entertainers showcase at the Garage Bar in Moorhead on Friday, August 15 at 9pm!

Bad Weather Burlesque will also be marching in the Pride parade on Sunday, August 17 at 2pm, Downtown Fargo. Come out and say hi!

My new class session starts Saturday, Sept. 6 at 10am at the Spirit Room in Fargo. Looking forward to seeing everyone after summer break!

Check out our friends up north when the Lovely Dozen hosts a series of workshops with Amy Danielson. There will be a fantastic show that Saturday night, so if you can’t make the workshops you can catch some great shimmying!

And there you have it! Stay tuned for more updates!

World Bellydance Day

Wow, did we have a blast last weekend! First we had a little hafla on Friday night (OK, I was late but I still caught some good stuff).

Improv drumming with Gaia, Lauren Boldt, Natasha, Kelly and Amanda

Improv drumming with Gaia, Lauren Boldt, Natasha, Kelly and Amanda

On Saturday morning we did body conditioning for bellydancers with Lauren Boldt – it was hard, but fun!

Then Shimmy Mob at the Grand Cities Mall!

Then after lunch back to work as we practiced drumming and dancing during the “Insane in the Membrane” workshop. I pooped out after a while because I was not feeling well. But the rest of the class were real troopers.

Drumming and Dancing!

Drumming and Dancing!

And finally in the evening we performed at the UND Burtness Theatre – so many super talented ladies!

Kismet!

Kismet!

And after we all went out to eat I collapsed because my head cold finally got to me. But, as quick as the weekend went it was a great time! Special thanks to Lauren Boldt, who is a fabulous dancer and teacher, and just a delightful person; Natasha and the Lovely Dozen for hosting and doing most of the heavy lifting (especially Natasha for her Shimmy Mob organizational help!); my Kismet ladies who get me through each week; and everyone who participated in the show and contributed to CVIC. Love you all!

The Latest Bellydance News!

Greetings everyone! We’ve got lots of stuff coming up:

Winter session is almost over but summer is so far away! I’m going to have four single-subject classes in April to round out the season:

  • April 5: Intro to veil work – I will show some basic moves and we’ll learn a short drill/choreography. Veils will be provided if you do not have your own, but there will be a limited number.
  • April 12: Shimmy intensive – We will learn different types of shimmies.
  • April 19: Music and Rhythm – basic overview of common Middle Eastern rhythms as well as popular dance music. Bring your zills if you have some. (Yes, I am aware this is Easter weekend).
  • April 26: Regional Dance Styles and Costuming – brief overview of the differences in styles of bellydance and the costuming that is commonly worn with it. I will bring samples from my own collection.

Shimmy Mob registration closes for adults in the USA on April 4. Better hurry up and register! More info here. Please consider donating to our chosen charity, CVIC Inc through our GoFundMe link.

Bad Weather Burlesque will be holding a “Burlesque 101” workshop at the Red Raven at 7pm April 7 and also April 28. We will be covering such crossover topics as posture, stage presence, makeup and glitter. This is free and open to the public, although if you want to donate a couple of bucks we wouldn’t turn you down. 😉

Hope to see you soon!

Antler Headpiece How-To

At Dr. Sketchy in my reindeer costume. Photo courtesy Sabrina Hornung

At Dr. Sketchy in my reindeer costume. Photo courtesy Sabrina Hornung

I had an itch to make an antler headdress for the holidays, but I had no idea where to start. So, I just looked around my craft room and this is what I came up with.

Materials:

  • carpenter’s fabric (can be purchase at a hardware store by the foot)
  • wire
  • felt
  • thread
  • sewing needle
  • decorative fabric to cover
  • mostly-matching horns (found shed antlers on Etsy.com for $26 for 4 pieces)
  • Decorations of your choosing
  • tin snips (about $17) or other heavy-duty cutting implement

You do not require very large quantities of any of the above.

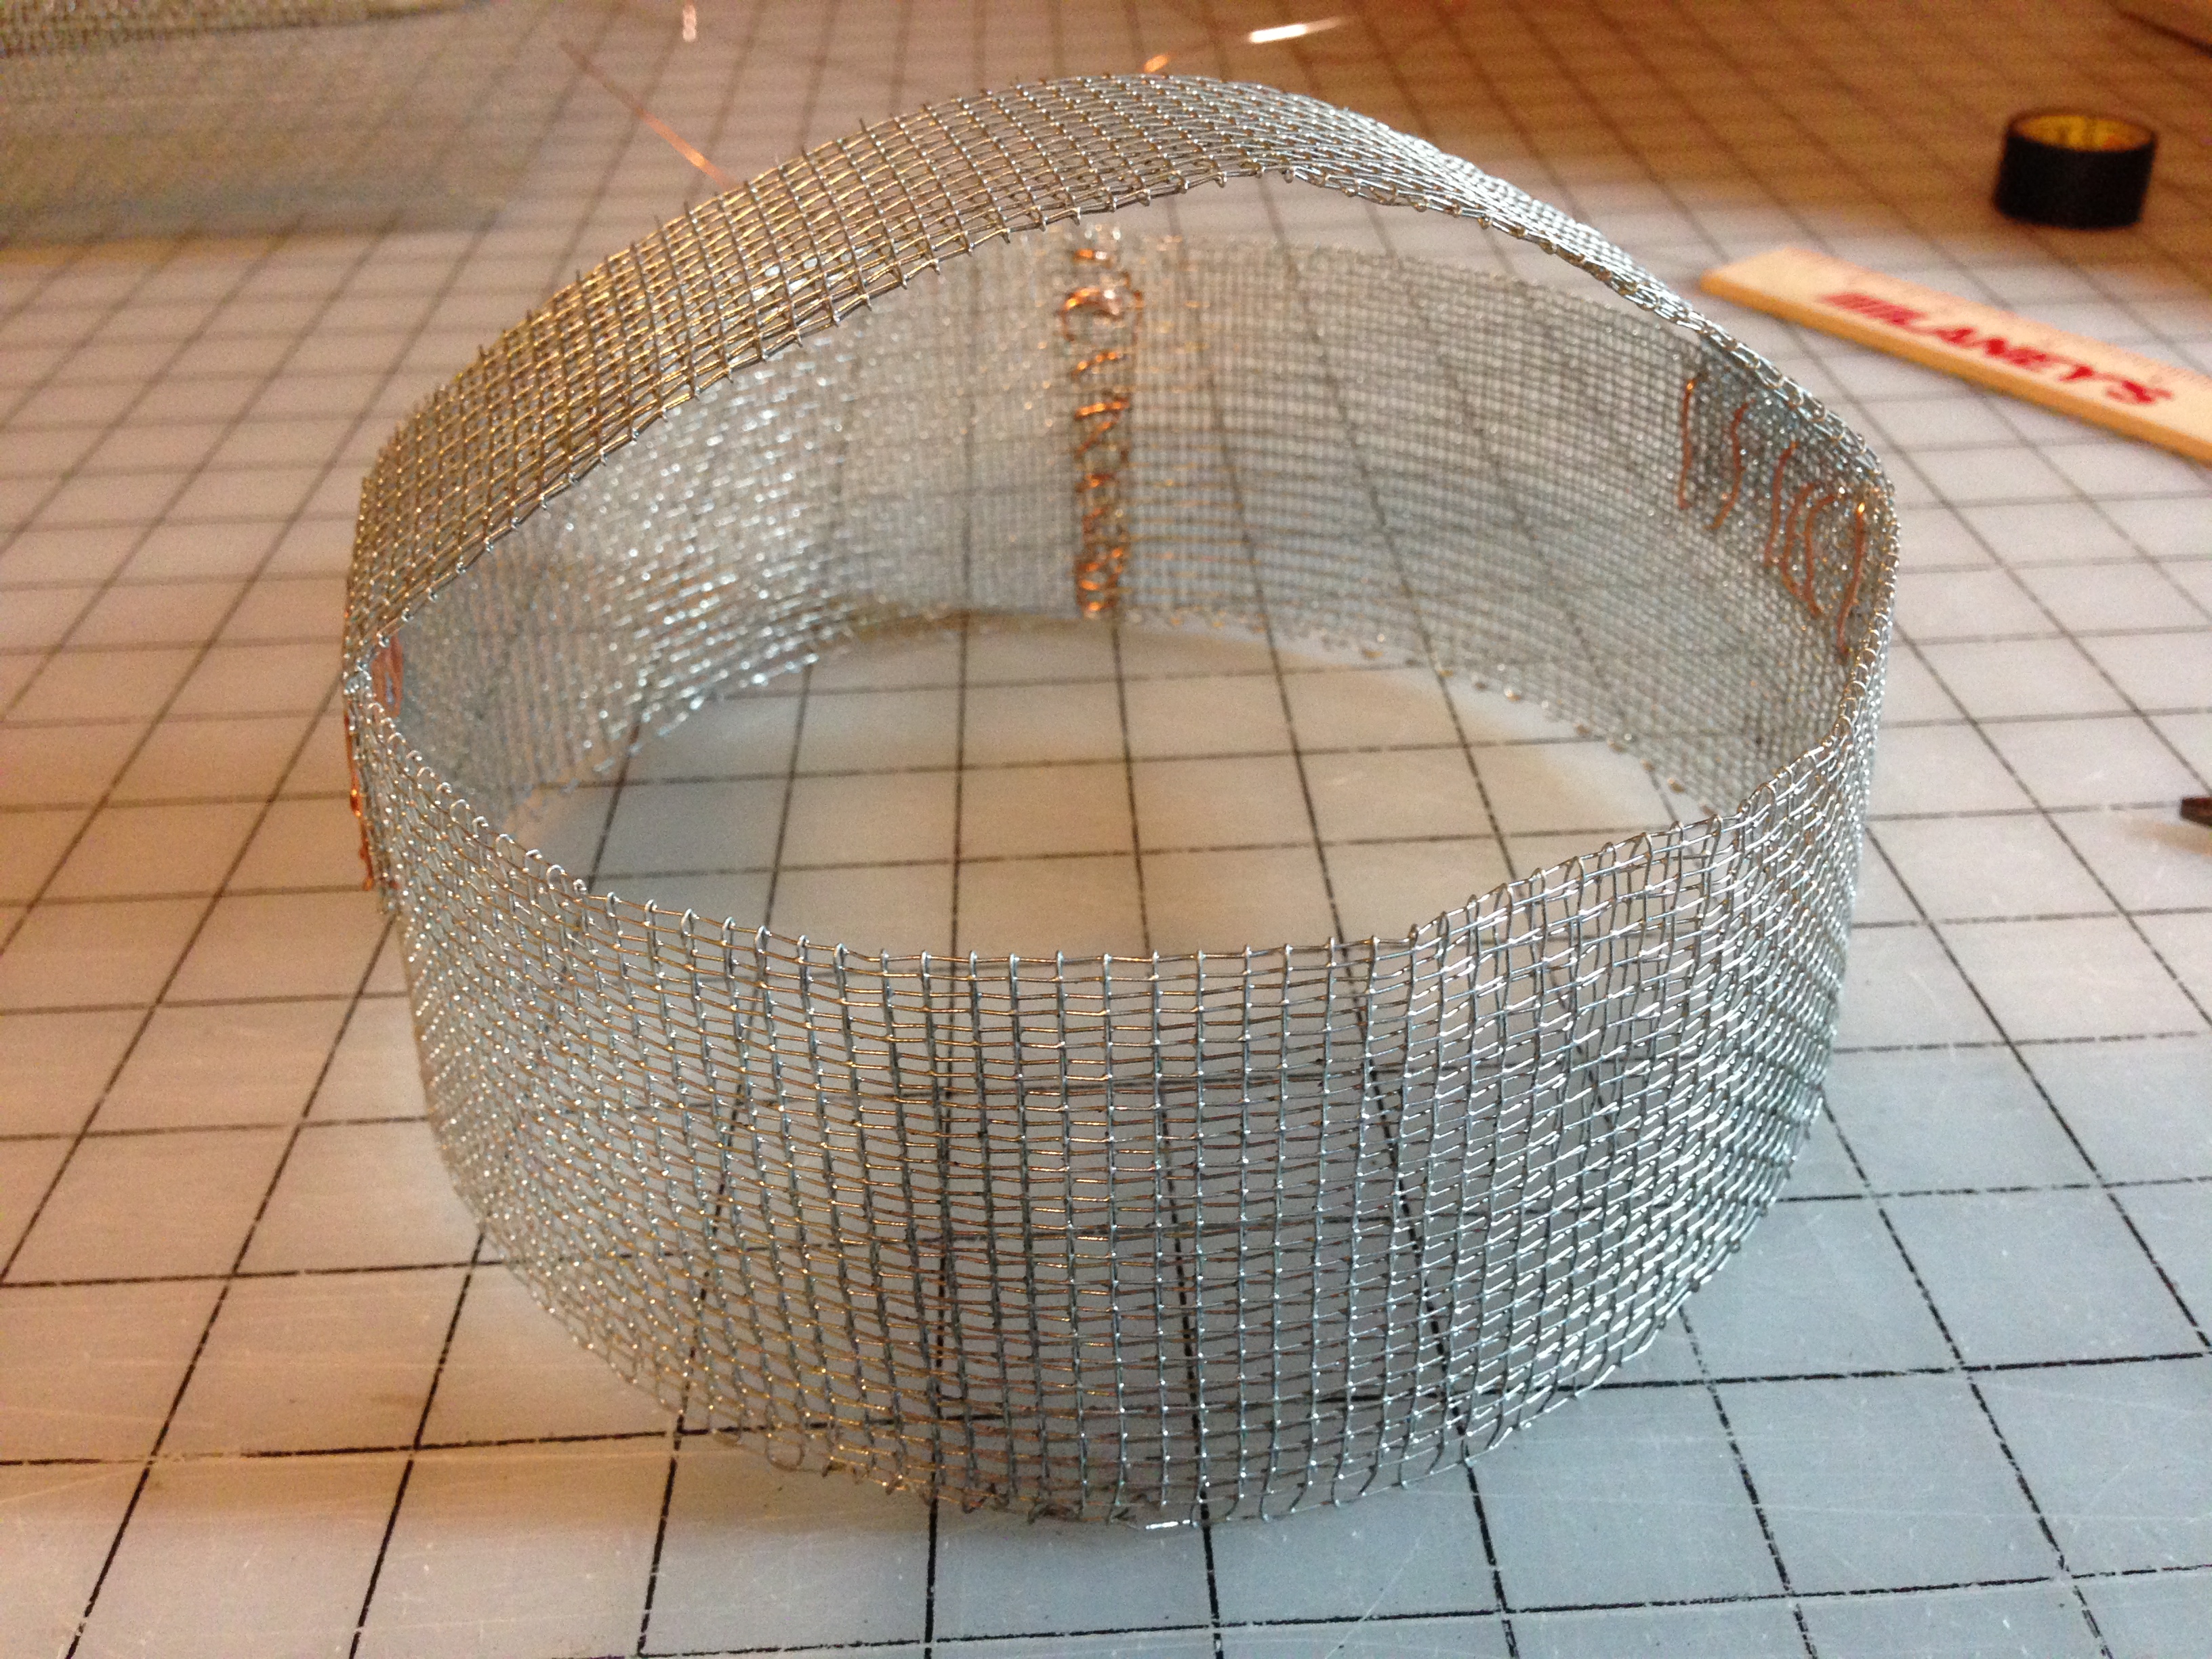
I started out measuring my head around where I wanted this crown to sit. I wanted the finished product to be 22 inches around and 2 inches wide. I ended up cutting a piece of carpenter’s fabric 4 inches x 23 1/2 inches. I wanted some extra play because I knew I would probably be lining it and that adds some bulk. To make it extra sturdy I folded the piece long-ways so it was double-thickness, so the 4 inches became 2 inches. I then pulled it into a circle, overlapping 1/2 inch on each side and I basically whip-stitched that closed with wire. Do not go by my measurements – measure your own head!

Cutting with the tin snips

Cutting with the tin snips

Fold it with the straight edge

Fold it with the straight edge

wire it all together

wire it all together

When working with carpenter’s fabric make sure to WEAR GLOVES. It is all wire so it is very pokey. I used tin snips to cut it (do not attempt with ordinary scissors). Because I am a craft freak I just happened to have 2 different sizes of tin snips in my craft room. I used a metal straight-edge to help me fold the sections evenly.

Next I made a piece to go over the top of my head for extra stability. I only wanted a 1 inch width on that so I made a 2 inch x 10 inch piece out of carpenter’s fabric, folded in half like I did the larger piece. I overlapped the very ends of that top section with the round section I just made, making sure it was evenly placed, and whip-stitched it with more wire.

Because the carpenter’s fabric is very textured I covered the base with felt. I wish that I had folded over the top, so I recommend you do that. I just wasn’t thinking on that. Sew the felt on with a thread and needle. It’s really easy to go through the carpenter’s fabric since it is just a wire mesh.

cover it with felt

cover it with felt

Next I added the horns. I had already drilled tiny holes in the base from a previously less-successful attempt to make a horn headdress. I placed the horns at the points where I had added the top band for extra stability. I wrapped the wire through the holes in the horns, but then just ended up wrapping it around the outside also for even more stability. I thought originally that I could poke the wire through the felt, but that did not work so well so I ended up cutting out sections of felt where the horns were placed.

wire on the horns

wire the horns

For the fabric cover I used stretch velvet. I would recommend this over a non-stretch fabric because it is very forgiving. I cut a single strip long enough to cover all the way around and also wide enough to fold and stitch in the back. Basically 23 inches x 4 inches. I went over the top of the horn section so I needed a little more play in the fabric. But I stretched it a little tight when whip stitching together around the inside of the base. It was a little awkward at the horn sections so I folded the fabric around the bottom and tacked it at the top to conceal the wire. I covered the top support in a similar manner, and blind stitched where the top met the sides. The illustration may do a better job of explaining this.

cover with fabric

cover with fabric

This leaves a diamond shape of exposed wire. I stitched in felt on both sides to cover.

At this point you are pretty much done. I am a big advocate for sewing on your decorations whenever possible so you can reuse them if you change your mind later. I had some square jewelry components, originally meant for a bracelet that I decided to use. I didn’t feel they were big enough though so I cut out 3 diamond shapes out of buckram, covered them with a contrasting burnt gold fabric and sewed the jewelry onto them. I happened to have some left over gold beaded fringe so I added a couple pieces to the side decorations. And there you have it!

I do the decorative stuff in my comfy chair in the living room

I do the decorative stuff in my comfy chair in the living room

Apart from the cost of the horns and the tin snips this is a $10 or less project. If I were to do this again (and I will!) I would make the main band 1.5 inches instead of 2. It is a tiny bit more wide than I would like. Also, I would make sure to wrap the felt all the way around the top and bottom of the main headband. Other than that I’m pretty happy with it. Please feel free to ask questions or comment below.

Lots of Great Events Coming Up!

Bad Weather Burlesque Tribute to the Beatles!

Bad Weather Burlesque Tribute to the Beatles!

Winter weather getting you down? I’ve got some activities to get you all warmed up!

So get ready for some serious shimmying – see you there!

Makeup Review: Ciaté Caviar Nail Texture

Ciate Caviar

Ciate Caviar

Much like my face makeup collection, my nail polish and lacquer collection is ridiculous. I have been eyeing the Ciaté Mini Mani Month collection since last year. I finally got lucky and caught the post-holiday season sale – bargain! I am not going to review the whole box of 24 polishes, lacquers, caviar, glitter and sequins here, because I don’t have that kind of time. Today I am just reviewing the Caviar nail texture effect.

How it works is that you put on 2 base coats of color to make sure it is good and thick, and one nail at a time pour the tiny beads over the top of your wet fingernail. Then immediately, gently, press the beads into the polish with your finger so they stick. You would do this in the same manner as glittering something. Make sure you have a bowl underneath and then use the tiny funnel to put the extra back in the bottle when you are done. So do that 10 times. It actually goes pretty fast. Now normally after I have done this I would let it set up for a while and then put a top coat on it. But the instructions specifically state NOT to use a top coat. Maybe it affects the finish? I don’t know. I read some reviews of the product and most users said that the stuff falls off like crazy, except for the one rule breaker who used the top coat. She said it lasted a long time.

I followed the instructions to the letter and found that about 1/3 of it had come off in less than 24 hours. I will admit it is very difficult to not run your fingers over the manicure because it’s a weird texture to have on your nails. But I thought I was pretty good about it. I found that the little beads kept catching in my hair and, well, everything. That was not the biggest problem. I did not mind that so much until it started falling off into my food. Just imagine you are enjoying your nice dinner and then CRUNCH, like you just bit a big grain of sand. My teeth hurt just thinking about it. Bearing that in mind, do not even consider trying to do a lip effect like they do on the promotional material.

But, it really does look cool when it is fresh. So, I would only use this for a photo shoot or show, and I would only put it on right before I had to be somewhere and take it off right away when I was done. You can just run another fingernail across the beads and they pop right off. I’d probably use a top coat too.

I think this is Cotton Candy

I think this is the Cotton Candy manicure

Just a little note on the Mini Mani Month though, it is full of other good stuff I can and do use. I’ve been wearing a pale pink polish for about a week now and I have no chips or anything. When I give myself a manicure I do a base coat and top coat so I don’t have to keep re-doing it. Base and top coats are OPI, which I love.

In conclusion:

Pros:

  • Looks cool (for a little while)
  • Easy to apply

Cons:

  • Expensive ($19/kit)
  • Does not last long
  • Comes off in your food

A Letter To Miles Copeland

ED NOTE: I may not have made it clear in my original posting that I did in fact get resolution from BDSS accounting 4 months after the show. I had chosen to publish this letter as an expression of my concern about BDSS business practices, and as information to other potential sponsors. Please see the full story at the Gilded Serpent.

As some readers of this blog may know, in February of 2013 I sponsored Club Bellydance in Fargo/Moorhead. It was a pretty fantastic time, I must say, but there were some rough spots, particularly after the actual performance was said and done. The Gilded Serpent has kindly published my account of the entire experience which you can read here. As indicated in that article, on June 14, 2013 I sent the following email to Miles Copeland and I am publishing it here as information for anyone considering being a local Club Bellydance sponsor. As of publication I have not received a reply from Mr. Copeland, but this email was the impetus to finally get some resolution from accounting.

Dear Mr. Copeland and associates,

My name is Erica Franklin and I was the Fargo sponsor for Club Bellydance in February of this year. I am writing directly to you because I am having some rather serious problems with follow-up after the show and I have not been able to get any sort of useful response. It has been 4 months since the show and I have still not been paid. That also means my dancers have not been paid, so that is not reflecting well on me. After consulting with some colleagues I have decided to appeal to you directly for assistance. Please be aware that since my inquiry for advice resulted in a great deal of debate and interest, I will be sharing your reply with others.

I was initially contacted by Stevo Glendinning of course, but he never did give me a payment timeline. The day after the show my door volunteer informed me that Stevo asked him for the cash admissions, and when they were relinquished, Stevo did not count the money, but just wadded it up and put it in his pocket. Obviously this was a bit troubling. I had emailed Stevo but he has not replied to me. Since then I have been in contact with Roxanne Goon, who has made efforts to assist in resolving this, but accounting isn’t really her department so I felt I should not bother her with this issue any further. I would like to mention here that she has been very helpful and a genuine pleasure to work with.

But I digress. After 4 months and no resolution I appealed to some of my dance colleagues for advice. The replies I received were quite surprising. It appears that my issue with BDSS was not at all isolated, and in fact delayed payment and non-payment appears to be a rather serious and widespread problem amongst your sponsors and vendors. BDSS appears to be generating a bad reputation in this area. Some other sponsors have suggested that they would not produce Club Bellydance on future tours. Vendors had similar attitudes.

BDSS has done so much to promote Middle Eastern Dance in the years since it began, it is really heartbreaking to see that the company has developed such a poor reputation. I would like to see BDSS recover from this situation and that is why I am taking the time to inform you of how bad things have become. I hope you realize that because of the internet and workshops all over the country, we all know each other and talk to each other all the time. It’s just like any other profession or serious hobby. I hope you will take this to heart.

Because I do not believe Stevo has any receipt of payment I will give this info to you:

20 pre-sale tickets @ $20 ea = $400
67 door admissions @ $25 ea = $1675
Total ticket sales = $2075
$2075 x .20 = $415 due to me

Please let me know if you have any questions. I anxiously await your reply.

Makeup Review: Stila Magnificent Metals Foil Finish Eye Shadow

Stila Magnificent Metals Foil Finish Eye Shadow

Stila Magnificent Metals Foil Finish Eye Shadow

As a belly dancer I have a ridiculous amount of makeup. My “goddess” size Caboodle is full to the brim, and I don’t even keep my everyday makeup in there. So I have decided that I shouldn’t let this resource go to waste. I am going to share with you reviews of some of the stuff I buy so that you can decide for yourself if you want to give it a whirl. Just in time for your big New Year’s Eve party!

DISCLAIMER: I do not receive kickbacks or free samples from any cosmetic manufacturer or distributor. I buy these products with my own money. I am not subject to pressures to write positive reviews.

When Stila Magnificent Metals Foil Finish Eye Shadow came out I just had to try it. It looks so gorgeous in the jar, the colors are very attractive. I chose Comex Gold of the 12 colors available as I figured it would be more versatile for the stage. If I am limiting myself I will get either silver or gold to coordinate with costuming. And I am limiting myself, because the product costs $32! The kit comes in a small box that includes the color (which is a bit of a coarse creme shadow), a liquid primer, and a little metal pan to mix the two together in. The idea is you put a drop of the primer into the pan, dip your finger in the pot of color and then mix them together to create a slightly thinner cream. This is really, really messy. Stila did come out with a silicon fiber brush especially designed for this product, but it costs $18. I feel that if you are paying $32 for a jar of shadow that they should include an applicator. Your finger probably is the best applicator anyway. I tried this with a regular brush and it just does not work as well – there is not enough control. Although the application is messy the product does rinse off of the pan and your fingers pretty easily.

Since this is a creme shadow, and you really have no way to set it and maintain the intense color, it will crease slightly. I have tried this both with and without the primer and I have found that while using the primer makes the product go on smoother, it does crease less when you just put it on straight (with a regular eyeshadow primer base). Also, the coarse texture of the shadow makes the creasing easy to touch up as necessary. You won’t see any flaws in the application.

What it looks like for real

What it looks like for real

You can see above what it really looks like. It is freakin’ gorgeous. I actually really love this stuff. This is only one color, but you can get multiple colors and combine them. It is so sparkly and shiny! I would like to try another but I am not sure I want to make the investment. I would only be able to wear this to gigs. I couldn’t pull it off for every day. There are more subtle colors available, but for $32 I would stick with a regular shadow if you want subtle.

So, in conclusion:

Pros:

  • Gorgeous color
  • Easy to correct creasing (for a creme shadow)

Cons:

  • Expensive
  • Messy

I hope this review has been helpful to some of you when making decisions about your makeup purchases. Feel free to comment below.

Get Ready For Winter Session!

Winter Session Starts Jan. 4!

Winter Session Starts Jan. 4!

Happy Holidays lovelies! Just a reminder that Winter session starts on January 4. We’ll have new music, new choreography and a lot of fun.

Please note at the top of this page that there is a new tag – Workshops. My good friend Ezma Siddiqah is hosting the world renown Jasmin Jahal on March 1-2. I’m so excited she’s coming! This is a rare opportunity to have such a fantastic dancer and instructor right here in Fargo. If you have not been dancing long please note that the first workshop is appropriate for ALL LEVELS – that means you! So mark your calendars and sign up for early bird pricing.

Here’s hoping you get all the sparkles you desire!


Previous Older Entries Next Newer Entries