Loose Glitter for Eyes

Hey lovelies! I made my first tutorial video.

I’ve been at home for almost a year now. The precious few people who I actually come into contact with are just not interested in talking about glitter for any length of time. They certainly haven’t wanted to watch my forty-five minute slideshow about the history of glitter and its applications (hit me up after the pandemic if you want to see it). So I made a video. If anyone actually watches it I may make more. Feel free to ask questions in the comments!

Products used: EcoStardust Bioglitter in Clover, Fine size NYX silicone glitter applicator elf glitter adhesive elf concealer brush

Product Links: 

https://www.elfcosmetics.com/

https://www.nyxcosmetics.com/ 

https://ecostardust.com/ 

https://www.todayglitter.com/ 

https://www.bioglitter.com/

What to Expect When You Are Expecting an Impressions Vanity SlayStation®+ 2.0

Greetings! Wow, I should blog more often than every year and a half! I’ll work on that.
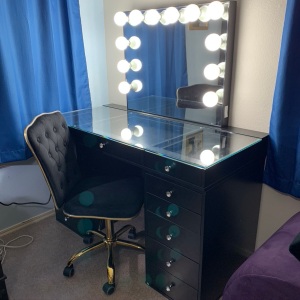
Impressions Vanity

Completed Vanity

I’ve wanted to get a proper vanity for some time now. I have a LOT of makeup and I spend a lot of time on it (particularly in the before times). Up until recently I had been sitting on the floor of our bathroom putting makeup on in a hand mirror. I looked around for different options and I finally came to the conclusion that I wanted an Impressions Vanity.

Since they were having a Labor Day Sale I just went for it and got the SlayStation®+ 2.0 bundle, which includes the glass top 3-drawer tabletop, two 5-drawer towers, and the mirror of your choice. It is made of particle board. I got the black finish to match our existing furniture.

When ordering I checked the shipping info. It said that the larger orders are shipped via LTL freight and would come on a pallet. They do not pay for lift gate service, so we would have to get it off the truck ourselves. I called customer service to confirm this. I work in LTL as my job, so I was prepared for the necessary labor, AKA, my hubs. He is wonderful, by the way. He assembled one of the towers by himself while I was at work. When the product finally shipped it was sent via UPS parcel rather than LTL. So, the big brown van. That was fine, and the driver helped Paul get the packages to the door. The product came in four (very heavy) boxes. One box for the two towers, one for the table top, one for the mirror, and one for additional chair I ordered. There were lots of dings in the boxes, but the furniture was packaged extremely well and never came close  to actually being damaged. However, all of that packaging created its own issues.

No real damage, thank goodness!

One of the surprising issues is that the sheets of styrofoam shed onto the furniture pieces. It took extra time to vacuum off all the little pieces. It was a mess. I am not complaining, just warning that if you order one plan to have or borrow a vacuum with a hose and attachments. Really, this did save the product from damage so it’s worth the extra time.
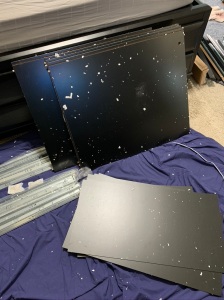
Styrofoam stuck to furniture

So much styrofoam!

The whole project is very much like an IKEA situation. Everything is completely disassembled, even the drawer rails. To put together a single drawer there are technically eight pieces, not including the screws. The instructions were pretty clear for the most part. It wasn’t difficult to assemble, just time consuming. I would estimate over the two days it took about eight hours or so, and that is with two people working on it. The only snag we ran into is when we accidentally had one of the rails off kilter and forced it in to the tower. It ended up ripping out half of the ball bearings. But the metal in the rail was soft enough to manipulate and get the bearings back in place.
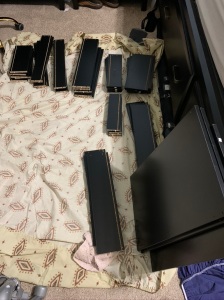
Lots of pieces

Lots of pieces

The mirror comes as two pieces (plus bulbs): the mirror itself and a stand. There are mounting holes on the back of the table top, which works great. But, because I am nearsighted and I wear glasses most of the time, I elected to put the mirror back on the stand so I can move it closer toward me when necessary. With all twelve globe lights in place it is BLINDINGLY BRIGHT. However, my hubs cleverly noticed there is a small dimmer switch next to the power switch, so problem solved.

I’m enjoy using the glass top as a display for some of my glam things. I don’t have all three drawers filled, but I’m working on it.
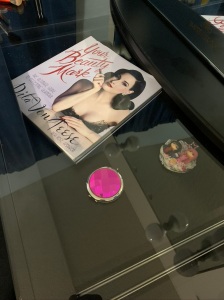
Some glam stuff

Some glam stuff.

I really like my SlayStation® a lot. However, I do have one issue with it. There does not appear to be any way to secure the vanity top to the towers. There are two bolt holes in the bottom of the table top, but there are no holes to connect them in the towers. Presumably those are meant to connect the top to a base that is just legs. This became a problem when I would reach down to open the bottom drawer. I would rest my hand on the top of the table and it would slide a little as I leaned down. The finish is sleek so it slides easily. We’ve rectified the situation by adding rubber grips we got at the hardware store. It helped a lot. I also put felt sliders on the mirror to move it back and forth on the table.

I would recommend the SlayStation® if you are prepared to deal with all of the issues as above. I am not paid to write this review. I’m not an influencer. Just a bellydancer who wants to give her peeps a heads up. Let me know if you have any questions in the comments.

SlayStation® Vanity Collection

Mascara Review: L’Oreal Voluminous Miss Manga and Miss Manga Rock

Rock, and Regular

Regular and Rock

Although I have enough Mascara from my Sephora Lash Stash to last me another year, I could not help but to check out the L’Oreal Miss Manga mascaras because, well, manga, duh. I did not realize that there were many variations on these, I had just picked up what was at my local Ulta store. In the picture above on the left is Voluminous Miss Manga in Black 373 (pink tube). On the right is Voluminous Waterproof Miss Manga Rock in Blackest Black 389 (yellow tube). I have been fairly conservative in the application, as opposed to their actual web site demos. I am surprised to say that the video is pretty accurate to what it looks like when you layer it on.

L'Oreal Voluminous Waterproof Miss Manga rock

L’Oreal Voluminous Waterproof Miss Manga Rock

L'Oreal Voluminous Miss Manga

L’Oreal Voluminous Miss Manga

As you can see above, the applicators are quite different. The regular has bristles of varying lengths throughout, the Rock has very short, stubby bristles that are supposed to kind of bunch your lashes together as I understand it. The effect really happens when you pile on the layers. I actually got into Astro Boy level lashes at one point (not pictured) with the Rock version. I really like this stuff, and it might be my new favorite, especially for stage since I dislike falsies. To be clear, this is NOT for a natural look. It is not soft – it really stiffens your lashes. I’ve been using this stuff for a while, and when I went back to Benefit They’re Real I was a little surprised when my lashes looked more like normal human lashes.

Benefit They're Real

Benefit They’re Real, for comparison

Miss Manga is definitely waterproof and stays put. I actually have to scrub pretty hard to get it off. I use baby shampoo to remove my eye makeup. If you have extra sensitive skin around your eyes you might take that into consideration.

And the best part is that it is only $7.99 per tube. A little more than some other drug store mascaras, but way less than prestige brands, for sure.

So I do recommend this for people who like to go crazy with the eye makeup. If you like a natural look this is probably not for you. Have you tried it yet? Post in the comments if you love or hate it.

UD Event Makeover

UD Naked Smokey Makeover

UD Naked Smokey Makeover

The Urban Decay Naked Smoky palette came out this week, after much breathless anticipation from my many fellow makeup addicts. Today there was an event and free makeovers at Sephora so I signed up (hey, free eyeshadow primer with purchase!) and told the artist to just go crazy. She seemed a little hesitant at first, but then got in the spirit of things.

So, I do not normally do a smoky look, especially accentuating my eyes in a rounder fashion. Hanging with burlesque artists I tend to default to an extreme wing/cat eye. It is interesting seeing what someone else would do with my look. I want to say we used 4 different colors from the palette, can’t remember the names but working in the cooler purple range. She also used a eyeliner pencil, but I did not catch what color it was. Urban Decay Naked Smoky is a really nice palette, but ultimately I did not buy it because I already have the Kat Von D Innerstellar palette and they have a lot of similar colors. They are both great brands.

The other thing I wanted to try was the Afterglow blush powder because they have some wild colors. I tried, and then ended up buying Bittersweet, which is purple (going for a theme). The artist was a little heavy handed on the application so I ended up blending it out a lot more when I got home. You can’t tell from the pic but it was kind of extreme. Not necessarily for every day but I could see me wearing this for a show. Major color payoff.

There was a lot of stuff going on with the eyes and cheeks so we went subtle with the lips. I believe we used the UD Revolution High-Color Lipgloss in Failbait. I only wear gloss when I have my hair pulled back, which I do today. My hair ends up sticking in the gloss otherwise, as many people have experienced.

We did not do my brows. I use Anastasia brow gel in Amber typically.

So I walked out of Sephora today with Afterglow blush and an eyeshadow single in Fireball. Fireball is one of the new duo-tone colors they just released recently. I also have Sideline and Tonic, and I really like them a lot. But for me the more unusual the better.

So that’s my story. Did you run out and by UD Naked Smoky right away? Did you like it?

Mascara Report Part 1 – High End Mascaras Without Photoshop

I learned about mascara late in life. I did not have much instruction on makeup as a teen, and even now I am learning new techniques for application, and about new kinds of makeup. I’m a bit of a freak for the makeup these days. I often like to get the Sephora Lash Stash whenever a new one comes out, and I grab mascara samples whenever I can get them, just so I can see how they compare. I have documented five different kinds here, and this is what I determined.

This pic actually creeps me out a little

This pic actually creeps me out a little

Here’s the thing: as far as appearance, I don’t think they necessarily look all that different. Maybe when my face is three inches from the bathroom mirror I can tell, but upon reflection they all stack up about the same for show. And of course the commercials and print ads are all a huge load of BS, obviously. So it all comes down to wear and comfort.

Benefit Bad Gal Lash

  • Smooth application
  • Flakes a little bit

Bare Minerals Lash Domination

  • Slightly dryer application
  • Slight flaking after long wear

Marc Jacobs O!Mega Lash

  • My favorite of this group
  • goes on like buttah
  • very minimal flaking

Tarte Lights, Camera, Lashes

  • Fine, but nothing special

Benefit They’re Real

  • Can be gunky, goes on very thick
  • Flakes more than the others

Bonus: DuWop Lash Venom – no picture, I threw it away after a couple days because I had serious panda eyes after only a couple hours. I have never had flaking that bad before or since! Do not use!

Over the next few months I plan to review drugstore brands and see how they stack up. Feel free to mention your favorite mascara in the comments!


Makeup Review: Ciaté Caviar Nail Texture

Ciate Caviar

Ciate Caviar

Much like my face makeup collection, my nail polish and lacquer collection is ridiculous. I have been eyeing the Ciaté Mini Mani Month collection since last year. I finally got lucky and caught the post-holiday season sale – bargain! I am not going to review the whole box of 24 polishes, lacquers, caviar, glitter and sequins here, because I don’t have that kind of time. Today I am just reviewing the Caviar nail texture effect.

How it works is that you put on 2 base coats of color to make sure it is good and thick, and one nail at a time pour the tiny beads over the top of your wet fingernail. Then immediately, gently, press the beads into the polish with your finger so they stick. You would do this in the same manner as glittering something. Make sure you have a bowl underneath and then use the tiny funnel to put the extra back in the bottle when you are done. So do that 10 times. It actually goes pretty fast. Now normally after I have done this I would let it set up for a while and then put a top coat on it. But the instructions specifically state NOT to use a top coat. Maybe it affects the finish? I don’t know. I read some reviews of the product and most users said that the stuff falls off like crazy, except for the one rule breaker who used the top coat. She said it lasted a long time.

I followed the instructions to the letter and found that about 1/3 of it had come off in less than 24 hours. I will admit it is very difficult to not run your fingers over the manicure because it’s a weird texture to have on your nails. But I thought I was pretty good about it. I found that the little beads kept catching in my hair and, well, everything. That was not the biggest problem. I did not mind that so much until it started falling off into my food. Just imagine you are enjoying your nice dinner and then CRUNCH, like you just bit a big grain of sand. My teeth hurt just thinking about it. Bearing that in mind, do not even consider trying to do a lip effect like they do on the promotional material.

But, it really does look cool when it is fresh. So, I would only use this for a photo shoot or show, and I would only put it on right before I had to be somewhere and take it off right away when I was done. You can just run another fingernail across the beads and they pop right off. I’d probably use a top coat too.

I think this is Cotton Candy

I think this is the Cotton Candy manicure

Just a little note on the Mini Mani Month though, it is full of other good stuff I can and do use. I’ve been wearing a pale pink polish for about a week now and I have no chips or anything. When I give myself a manicure I do a base coat and top coat so I don’t have to keep re-doing it. Base and top coats are OPI, which I love.

In conclusion:

Pros:

  • Looks cool (for a little while)
  • Easy to apply

Cons:

  • Expensive ($19/kit)
  • Does not last long
  • Comes off in your food

Makeup Review: Stila Magnificent Metals Foil Finish Eye Shadow

Stila Magnificent Metals Foil Finish Eye Shadow

Stila Magnificent Metals Foil Finish Eye Shadow

As a belly dancer I have a ridiculous amount of makeup. My “goddess” size Caboodle is full to the brim, and I don’t even keep my everyday makeup in there. So I have decided that I shouldn’t let this resource go to waste. I am going to share with you reviews of some of the stuff I buy so that you can decide for yourself if you want to give it a whirl. Just in time for your big New Year’s Eve party!

DISCLAIMER: I do not receive kickbacks or free samples from any cosmetic manufacturer or distributor. I buy these products with my own money. I am not subject to pressures to write positive reviews.

When Stila Magnificent Metals Foil Finish Eye Shadow came out I just had to try it. It looks so gorgeous in the jar, the colors are very attractive. I chose Comex Gold of the 12 colors available as I figured it would be more versatile for the stage. If I am limiting myself I will get either silver or gold to coordinate with costuming. And I am limiting myself, because the product costs $32! The kit comes in a small box that includes the color (which is a bit of a coarse creme shadow), a liquid primer, and a little metal pan to mix the two together in. The idea is you put a drop of the primer into the pan, dip your finger in the pot of color and then mix them together to create a slightly thinner cream. This is really, really messy. Stila did come out with a silicon fiber brush especially designed for this product, but it costs $18. I feel that if you are paying $32 for a jar of shadow that they should include an applicator. Your finger probably is the best applicator anyway. I tried this with a regular brush and it just does not work as well – there is not enough control. Although the application is messy the product does rinse off of the pan and your fingers pretty easily.

Since this is a creme shadow, and you really have no way to set it and maintain the intense color, it will crease slightly. I have tried this both with and without the primer and I have found that while using the primer makes the product go on smoother, it does crease less when you just put it on straight (with a regular eyeshadow primer base). Also, the coarse texture of the shadow makes the creasing easy to touch up as necessary. You won’t see any flaws in the application.

What it looks like for real

What it looks like for real

You can see above what it really looks like. It is freakin’ gorgeous. I actually really love this stuff. This is only one color, but you can get multiple colors and combine them. It is so sparkly and shiny! I would like to try another but I am not sure I want to make the investment. I would only be able to wear this to gigs. I couldn’t pull it off for every day. There are more subtle colors available, but for $32 I would stick with a regular shadow if you want subtle.

So, in conclusion:

Pros:

  • Gorgeous color
  • Easy to correct creasing (for a creme shadow)

Cons:

  • Expensive
  • Messy

I hope this review has been helpful to some of you when making decisions about your makeup purchases. Feel free to comment below.