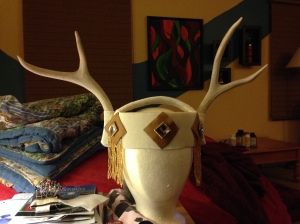
I had an itch to make an antler headdress for the holidays, but I had no idea where to start. So, I just looked around my craft room and this is what I came up with.
Materials:
- carpenter’s fabric (can be purchase at a hardware store by the foot)
- wire
- felt
- thread
- sewing needle
- decorative fabric to cover
- mostly-matching horns (found shed antlers on Etsy.com for $26 for 4 pieces)
- Decorations of your choosing
- tin snips (about $17) or other heavy-duty cutting implement
You do not require very large quantities of any of the above.
I started out measuring my head around where I wanted this crown to sit. I wanted the finished product to be 22 inches around and 2 inches wide. I ended up cutting a piece of carpenter’s fabric 4 inches x 23 1/2 inches. I wanted some extra play because I knew I would probably be lining it and that adds some bulk. To make it extra sturdy I folded the piece long-ways so it was double-thickness, so the 4 inches became 2 inches. I then pulled it into a circle, overlapping 1/2 inch on each side and I basically whip-stitched that closed with wire. Do not go by my measurements – measure your own head!
When working with carpenter’s fabric make sure to WEAR GLOVES. It is all wire so it is very pokey. I used tin snips to cut it (do not attempt with ordinary scissors). Because I am a craft freak I just happened to have 2 different sizes of tin snips in my craft room. I used a metal straight-edge to help me fold the sections evenly.
Next I made a piece to go over the top of my head for extra stability. I only wanted a 1 inch width on that so I made a 2 inch x 10 inch piece out of carpenter’s fabric, folded in half like I did the larger piece. I overlapped the very ends of that top section with the round section I just made, making sure it was evenly placed, and whip-stitched it with more wire.
Because the carpenter’s fabric is very textured I covered the base with felt. I wish that I had folded over the top, so I recommend you do that. I just wasn’t thinking on that. Sew the felt on with a thread and needle. It’s really easy to go through the carpenter’s fabric since it is just a wire mesh.
Next I added the horns. I had already drilled tiny holes in the base from a previously less-successful attempt to make a horn headdress. I placed the horns at the points where I had added the top band for extra stability. I wrapped the wire through the holes in the horns, but then just ended up wrapping it around the outside also for even more stability. I thought originally that I could poke the wire through the felt, but that did not work so well so I ended up cutting out sections of felt where the horns were placed.
For the fabric cover I used stretch velvet. I would recommend this over a non-stretch fabric because it is very forgiving. I cut a single strip long enough to cover all the way around and also wide enough to fold and stitch in the back. Basically 23 inches x 4 inches. I went over the top of the horn section so I needed a little more play in the fabric. But I stretched it a little tight when whip stitching together around the inside of the base. It was a little awkward at the horn sections so I folded the fabric around the bottom and tacked it at the top to conceal the wire. I covered the top support in a similar manner, and blind stitched where the top met the sides. The illustration may do a better job of explaining this.
This leaves a diamond shape of exposed wire. I stitched in felt on both sides to cover.
At this point you are pretty much done. I am a big advocate for sewing on your decorations whenever possible so you can reuse them if you change your mind later. I had some square jewelry components, originally meant for a bracelet that I decided to use. I didn’t feel they were big enough though so I cut out 3 diamond shapes out of buckram, covered them with a contrasting burnt gold fabric and sewed the jewelry onto them. I happened to have some left over gold beaded fringe so I added a couple pieces to the side decorations. And there you have it!
Apart from the cost of the horns and the tin snips this is a $10 or less project. If I were to do this again (and I will!) I would make the main band 1.5 inches instead of 2. It is a tiny bit more wide than I would like. Also, I would make sure to wrap the felt all the way around the top and bottom of the main headband. Other than that I’m pretty happy with it. Please feel free to ask questions or comment below.


Feb 19, 2014 @ 21:28:40
Love it! I have some antlers laying around that I want to make into a headdress too, but I was unsure how to make a stable enough base. This is a great idea. Thank you!
Feb 20, 2014 @ 13:17:56
If you do I’d love to see a pic!